Linux From Scratch and Beyond
The last and most difficult part of my project was Linux From Scratch (LFS).
The purpose of LFS is building our own customized Linux system entirely from source! This is something which you can find on the link above as well though.
From my personal experience, Linux From Scratch is totally awesome because it will give you deep insights on how Linux works, how different parts of it come together to work in unison.
The most awesome thing about LFS is that the stuff it teaches you is something you cannot learn by reading books or blogs, you can only experience it by doing! Believe me, it is one of the best projects you will ever get to work on.
Ideally, this post should be read after Learning Scripting the Hard Way and Learning Python the Hard Way.
For being able to do this, I had to learn a lot of things very fast, I spent about a week on bash scripting + command-line, 3 days on python and few more days on other small things required for diving into this project.
You might ask the question - “What is Linux From Scratch actually?” Let’s answer that, shall we.
What is Linux From Scratch?
It is technically a book by Gerard Beekmans providing step-by-step instructions on how to build a Linux system from source. It is freely available on the Internet (beauty of open-source).
If you are a systems or implementation guy, then you would definitely understand when I say that this book is so much more when you actually try out what is written in it.
LFS not only gives you insights into working of Linux, but you are able to understand the way systems are designed, you are able to feel how a system’s architecture is planned and how all of these tiny marvelous pieces of software fit together to resemble something so beautiful and elegant, its just like seeing your creation come to life. Sorry, my emotions took over me for a minute there :)
Back to what is LFS :P
LFS is built using an already existing (installed) Linux Distribution (such as Ubuntu, Debian, or Fedora, etc.), it basically uses the underlying kernel as the source to run everything that you are going to do and make. It also uses programs such as compiler, linker and basic shell to build the new system. Don’t worry, you still compile all of these from scratch for your Custom Linux.
If you are feeling lucky punk, then you can go ahead with the Raw Linux Kernel instead of using an exisitng Linux Distribution. That would in itself be quite an experience.
After you choose the basic distribution whose kernel is going to be the backbone of your distribution, you will be going through following steps (listed briefly):
- Create new Linux partitions and file system.
- Downloading all the packages which will be compiled and installed + storing them in the new file system.
- Setting up the environment + choosing configurations.
- Compile the compiler i.e. gcc, binutils, glibc (from source) etc
- Compiling rest of the necessary linux packages (from source)
- Change root to your new Linux System and go for a test drive.
- Now, you install all the packages that you want to use in your custom Linux.
- Setting up the linux configuration files like
/etc/*, locales etc. - Finally, setting up the BootLoader.
This is your custom Linux distribution now, you can make and install anything however you want as per your needs.
Getting Started
I started reading the LFS Book around 10th March during my mid-semester break.
The version that I was following was 8.0-SYSTEMD.
I was using ubuntu then and thus used the same kernel as the base for LFS. I started by making 30 GB unallocated space on my hard disk for the new LFS partition, this is where the root of my new Linux would be setup. At the same time I also created a boot partition of about 512 MB for the purposes of grub.
Once the partitions were created, proper file system had to be created for each of them. I used ext4 for the Linux root partition and I made the second partition as the EFI System. Finally, I mount the partitions at /mnt/lfs.
Nextly, I had to download all the packages to compile and install in the /mnt/lfs/sources (should be writable and sticky). “Sticky” means that even if multiple users have write permission on a directory, only the owner of a file can delete the file within a sticky directory (a second level protection).
chmod -v a+wt /mnt/lfs/sources
Finally, I downloaded all the packages using a simple combination of curl and wget
curl http://www.linuxfromscratch.org/lfs/downloads/8.0-systemd/wget-list | xargs wget --continue --directory-prefix=/mnt/lfs/sources
Now, I started setting up the environment, so that I can begin compiling the packages in the new Linux root partition. I created a new user for LFS. Finally, I setup the environment variables that were potentially required by LFS (atleast according to the book).
An interesting problem situation
My friend faced a problem after reaching this point, his words were: “I did the whole LFS thing yesterday and then switched to macOS but when I restarted back Linux again, the whole /mnt/lfs/sources directory wasnt there (..strange..), for now I did the whole thing again, but why did it get deleted in the first place? And only the dirs inside /mnt/lfs/ got deleted.”
When we asked whether he unmounted it (since this was a separate partition), he said that he didn’t umount, just restarted his machine.
Can you guess (or know) what happened here? Why did he find the directory /mnt/lfs empty after?
The Answer: Restart unmounts everything (obviously because you are turning off your machine). When it boots again, only the things in /etc/fstab get mounted back. So, if your partition/drive was not listed in /etc/fstab file, then you need to mount it manually to see its contents.
So, apparently my friend did the complete work twice just because he didn’t know this little but intriguing fact.
Small Detour: HTML Parsing + Web Scraping
Before moving forward with LFS, I first took a small detour in learning html parsing + web scraping (via BeautifulSoup).
HTML is a markup language, so it has a defined structure and it can be used to parse and retrieve specific information from pages. A lot of services out there work on HTML/XML parsing and Web scraping. News websites are good examples, they collect stories and articles from multiple newspapers/stations and present them to you on a single platform. This is done via scraping itself.
Why did I take this detour you might ask? For the next part I had to compile and install many things from the book which meant I had to copy and paste a lot of commands in the terminal. Well, that’s a drag!
So, I thought why not just retrieve all of the commands from the HTML book, dump them in a single file (kind of like bash script) and then run this script (just one-time) and done!
Since, HTML is already structured, all the commands in the book were within the following tags:
<kbd class="command">
../configure --prefix=/tools            \
             --with-sysroot=$LFS        \
             --with-lib-path=/tools/lib \
             --target=$LFS_TGT          \
             --disable-nls              \
             --disable-werror
</kbd>
So, my task was to fetch all of such code blocks, dump them in a bash script in the order of the book itself and run the bash script :P
The code I wrote for parsing and scraping the data can be found on Github as bs4parser.py
Also, the final bash script which was formed can also be found on Github as finalscript.sh
Back to Linux From Scratch
After I had the bash script ready for installing all the required packages to actually compile and run my new system, I just had to run that. I faced a few errors along my way but I handled them with vim and vigor.
Finally, when everything required was compiled, I ran the following command to become the root in my new system:
chown -R root:root /mnt/lfs/tools
At this point, the project had 2 parts which could be done in any order or simultaneously as well, they were:
- Install all the required packages in your newly created Linux system (customize to your needs).
- Write a new package manager to manage versions of packages installed in your new system (part of BLFS actually).
First one of the above is kinda self-explanatory, I could keep on going installing packages in my system as required, it is something which is a never-ending task :)
So, I decided to start with the second one first, i.e. writing a package manager. This actually wasn’t part of LFS, LFS ends when you have a working Linux system, to actually customize it more and building on top of it to make it more usable is something which is part of Beyond Linux From Scratch.
Package Manager in Python (BLFS)
Firstly, let’s define a package manager - It is a tool (or maybe a collection of tools) automating the installations, upgrades and configurations of the packages/applications in your system. It’s basically something which is required to make the system usable :P
Without a package manager, you will have to manage all the versions and dependencies of your packages manually and believe me, it is no “walk in the park”.
So, to write my own package manager, I picked python as a language, it was a simple choice. And now, I had to actually read up on:
- How one writes a package manager?
- How do you deal with so many package versions?
- How do you resolve all the dependencies for your package (and its dependencies themselves)?
- How do you handle cyclic dependencies?
There were many questions to answer, all of which would be difficult to explain here, so I will be brief :)
A package manager builds a version/dependency tree for each package using an algorithm called Topological Sort.
To demonstrate what I meant by above, let’s take a following example:
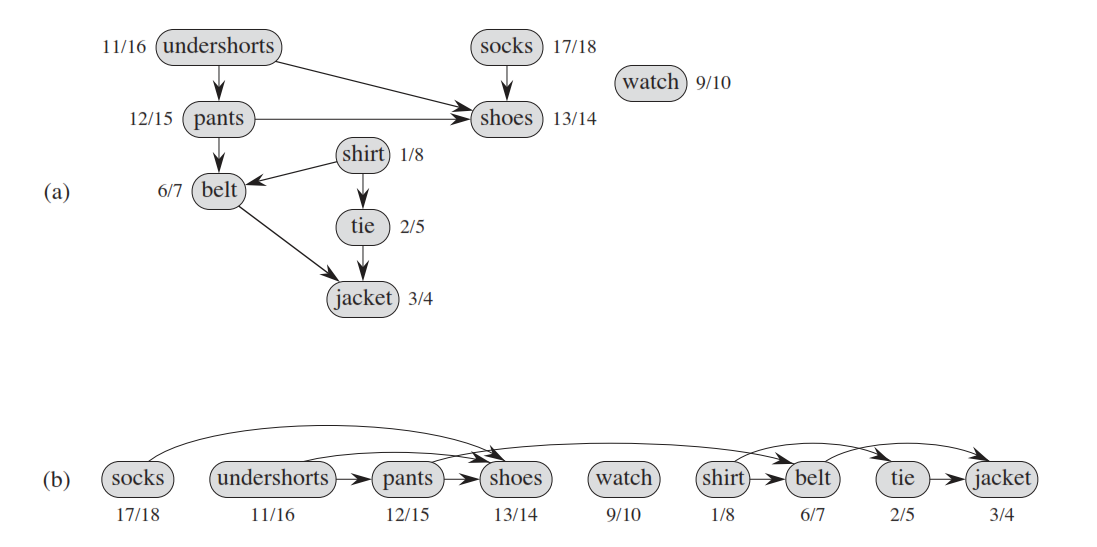
You want to dress up, and you have multiple articles of clothing you want to wear, then you will have to decide which article(s) need to be worn before a certain chosen article. An example above - before wearing my shoes, I must wear my pants, undershorts and socks since I can’t wear them after, so they come before in the tree.
A package depedency tree works in a similar fashion, if I want to install a package called vim, all of its depedencies must come before it in the tree otherwise it can’t be installed.
Once, the package manager creates this tree, it installs the packages in a top-down fashion (hence called the topological sort).
Interesting case of Cyclic Dependencies
This is one of the very interesting problems that you would have to work with when dealing with dependency resolution. As most in the programming community like to call it - “Welcome to Hell!”.
There are so many approaches to it, none of them are complete. I’ll give you a brief idea of how I used to tackle it in my package manager.
Let’s say there are 3 packages A, B and C with versions 2.1, 3.1 and 4.1 respectively such that C depends on B, B depends on A and A depends on C
C (2.0.x) -> A (2.1) -> B (3.1) -> C (4.1)
In the above case, we first take the version and package user wants to install which is C version 4.1, we see there is a cycle forming here, so to resolve the cycle, we pick a lower version of the same package in the dependency, in this case it is 2.0.x for C which will allow us to install other dependencies and finally the package we want.
Obviously, it is not a perfect solution but it works almost everytime because if packages have cyclic dependencies, this is how it is usually resolved.
A side note: even pip in python works the same way :)
Conclusion
Building the Package Manager as part of BLFS was the end of the project for me (not really :P). One can go into depth however much they want but don’t loose your soul on the way :)
Adding a famous xkcd meme here.
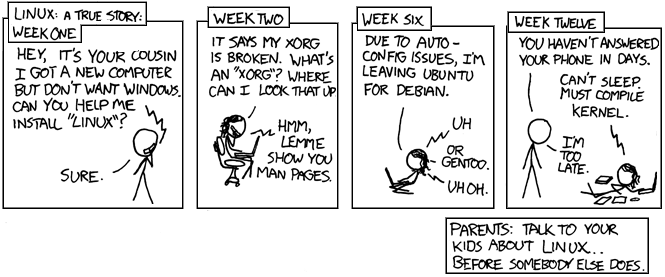
This really is a true story, and she doesn’t know I put it in my comic because her wifi hasn’t worked for weeks.